
I realized this afternoon that I basically explain this technique to an Etsy Labs visitor at least once a day, but had never put the instructions online. So, here it is. Fusing! Plastic! Bags!
Do you have one zillion plastic drugstore and grocery bags under your sink, or perhaps smushed into a drawer? Ever wanted a cheap and easy use for them? One that leaves you with an intriguing and useful homemade craft supply? Do you have an iron? Why don't you fuse them together?
What you'll need
Plastic bags (thin, flimsy ones work best)
Parchment paper, freezer paper or plain old copier paper
Iron (and your favorite ironing surface)
Making it
Flatten out the bag and trim the bottom seam and handles off. This allows the bag to be opened up into a larger rectangle of plastic. 
Turn the bag inside-out if it has printing on it. Once the ink heats up, it comes off the bag and makes a huge mess. If the bag has an interesting design that you'd like to preserve, try using a clear plastic bag layered on top of the printed one.
We find that between 6-8 layers of plastic gives the best results. So, you can either fold your bag twice until it is 8 ply thick, or use three or more bags layered on top of one another. Trying to fuse less than 6 layers often results in little holes forming in the finished piece and a generally weaker material.
Sandwich your plastic bags between the parchment paper
Next, run a hot iron (we set ours to "Rayon", but you will need to experiment a little to see what works for you) and keep the iron moving constantly. Make sure to get the edges, and after about 15 seconds, flip it over and iron the opposite side for a few seconds. 
Peel a corner of the paper back to see if the plastic is fused together. It should be fairly smooth and "one sheet" to the touch (watch out, its a little hot). If the layers are not all melted together, iron it some more. 

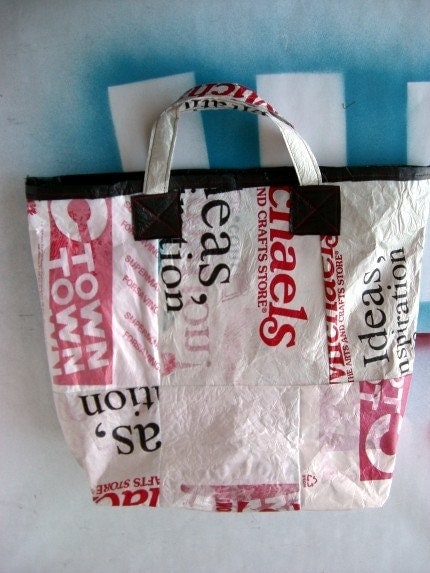
Peel the parchment paper away from the finished plastic sheet. Voila. Now, you can use this stuff to make a million things. We've made re-usable grocery totes, wallets, and floor cushions; I think its an inexpensive way to make waterproof linings for beach bags and makeup clutches. 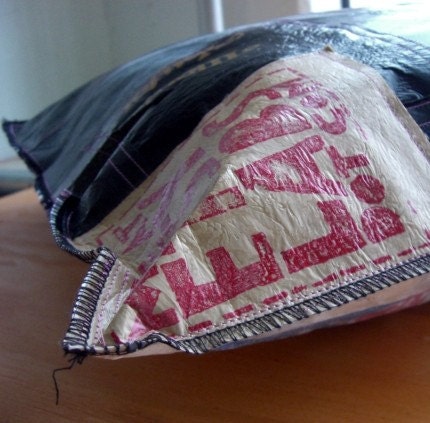
Here are a few more rad examples of what you can do with this stuff, courtesy of Etsy seller Eclipse 

Alright, y'all. Don't forget to open a window when you do this to avoid potentially brain-damaging fumes. Send us pictures of your creations, or add them to the Etsy Labs flickr pool
06 May 2007
Long Overdue Fusing Plastic Bag Tutorial
![]()
Subscribe to:
Post Comments (Atom)
412 comments:
1 – 200 of 412 Newer› Newest»such pretty fingernails in the tutorial!
Fusing plastic is so much fun. When I go shopping now I am more excited about the bags than what I bought.
Oh man, I think I now MUST make one of these! Love it
So this is about a month late..but thanks for the awesome tutorial Anda! I finally got around to fusing plastic! And I made lots of neat stuff. I even posted my first bag in my shop...there will be many more!! I love that you all post up great tutorials, but even more I ove that EtsyLabs is so into recycling and repurposing! You guys rock!!
-kristin
(winifredstudios)
Perfect! Thank you!
Oh dear, between crocheting bags and fusing them I'm actually starting to worry that I will run out of raw materials. . .
very cool. Can you fuse plastic to fabric this way? Then you'd have water-resistant fabric.
I haven't been able to fuse the plastic to fabric. Maybe if the fabric was synthetic and had a little melt to it?
It's great! Thanks for this tutorial. I have already started to fuse and realized it's getting tougher and tougher to get the raw material ;o) Would you mind if I translate this tutorial in French and add it to my blog with a link to etsy of course.
Oh, I would love it if you translated it into French! Make sure you send us the link. :)
this is amazing! I can't wait to get home and try this out. thank you! :)
Great idea!!! You say "Parchment Paper," but the paper on the picture looks like wax paper. Can we use either one?
this is such a great way to make crappy plastic bags useful, but is no one concerned about toxic fumes from melting plastic?
Ooh, I have a cupboard full of them. Now just to decide what to do with the resultant fabric.......
Question: Will this mess up the iron & ironing board at all?
I ask because the iron & ironing board that I have access to belongs to my mom -- I'd feel really bad if I messed them up!
Thank you for writing and posting this. ;)
I found that you can also use a very good quality silk taffeta instead of the paper. I have used a hunk of it again and again and it doesn't absorb the plastic bags, it just peels right off. I am going to list some in my etsy shop, helloknitty
Has anyone tried adding leaves, dried flowers or even confetti or other fun stuff between the layers? The whole fusing idea is great - I am actually going to make my own resuable grocery bags.
Shouldn't we be concerned about copyright laws here? Can we actually sell item from these sheets with company logos on them?
what a great and easy and quick way to re use these...will try with my older kids!!! undersupervision of course!!! wow!!!
Emerald cat- Probably not. Don't sell things you make with others' images without permission.
this sounds like it would work for sling backpacks and/or messenger bags that would double as lunch bags too
I'm thinking about trying to weave strips of bags together, THEN fuse. :3
I've given this a try but find that if I put the iron on the lowest setting, nothing fuses but if I increase the temperature, everything scrunches up and sticks to the plastic? any tips on what I'm doing wrong?? thank you very much
I love this idea!
I can't wait to play with this.
Thanks
Just wanted to say I have been having a blast fusing plastic! I feel like a mad scientist down in my basement! I find myself talking out loud saying, "I think if I add this it would be neat!" "another layer would really make this less flimsy" I am still trying to find the right setting. So far 3 1/2 on my iron just above rayon seems to work. At 4 things start to buckle and at 3 I tell myself this will never fuse. I have to watch that the iron doesn't automatically shut off while I am arranging my plastic. Finally I want to say that I have not had problems with ink melting so I have been able to iron these on the right side. One exception was a bread bag. I still haven't made anything but I have some ideas. Thanks for sharing this idea.
I fused dry cleaning bags my uniforms come in weekly. I hated the thought of throwing these things away. I made a curtain for a window I wanted the light through but had a bad view of a garage. And I see possiblities of making some sort of covering for a greenhouse. I also thought it'd be nice if I could add in a sparkle element or dried leaves, etc between layers. The possibilities are endless.
There just aren't words for how much I love this idea!
What a wonderful bunch of ideas. Thank you for sharing this.
I finally tried it today - I found you could not put anything between the layers as it stopped the fusing or caused extreme melting. Also, my hint is that you should start right in the middle where all the layers are when fusing. It is the edges where there are not as many layers that seems to scrunch up really quickly.
I think I initially saw this project in the ReadyMade Book a while ago. Nice demo, though.
I'm so glad that you shared this info! I have seen several handbags on Etsy that were made from plastic bags and was so curious as to the process! I attempted weaving a bag from strips of plastic not long ago, but it really didn't turn out like I wanted. But THIS is a GREAT idea! I can't wait to try it myself! Thanks!!!
love this - but mine aren't coming out pretty - too wrinkly. i'll keep trying. thanks again!
Is this material machine washable? Would it hold up in the dryer? I would like to use it with some cotton sewn on to it and I'm curious how it would hold up if I had to wash it.
Just did my first fusing project. Very fun. I have to perfect the technique but I'm very happy with even my first time.
THANKS!!
Just made my first fused plastic bag tote and now all my friends want one! What a great "green" project! Thanks :)
Hey just wondering if there are lazy ways to decorate these things. I saw that adding colo, leaves, etc between the sheets doesn't work. Anyone tried printing? or painting with success? I guess You could collect only nicely colored bags, or sew designs after the fact.... but there has to be something more... efficient. Right?
Can you sew the fused plastic on your sewing machine?
Yes emily I've been Able to sew no problem. I've also heard about people using soldering irons for a more water proof seem. Haven't tried that yet.
Just wanted to add and halloween is coming and my costume requires a sort of blue suit. So, using your tutorial I am making a suit-type from blue recycle bags. The perfect solution to my q-tip costume!
That is so awesome! I have never seen anything like it! Great job, thanks for sharing!
For those of you making totes and the like, are the pieces you're fusing large enough in the first place to encompass say, one side or whatever, and then you make the tote in the normal fashion as you would with fabric; or are you making smallish pieces according to whatever you get by folding the layers of plastic, and then fusing THOSE pieces together? Or do you sew the smallish pieces together patchwork-fashion?
Has anyone tried a heat gun -- like the kind used for stamp embossing?
I scraped crayons onto the plastic in between the layers and it gave it a nice pattern of color. I bet any colored wax type of material would work.
This is the most awesome idea! I just have to try it! Maybe I'm a bit of a pyro, but I looooove melting things!
Thank you for the great idea on fusing the plastic bags. I use the bags for my garbage bags, yet I still have too many. And I was about to make some new coasters using material, and I think the fused plastic between layers of fabric is just what I needed. Thanks again for the great helpful idea.
how about using embossing powders (like "opals") between the layers or even on the outsides? might be a good easy way to get some color or design going.
So, over 30 bags later, nothing but scrunched and burned, or un-fused. It's such a wonderful idea, I had a million projects in mind but... I must be totally stupid. Tried different settings on iron, different parchment papers, varied thickness in bags, varied amt of time spent ironing, you name it. I'm not easily discouraged and rarely quit a project -- but this one got me.
I envy those of you who can do it! You are making amazing things. Guess my bags will have to go back to their intended purpose -- dog poop scoops!
-EditorMule
This is so cool that I couldn't resist sharing on my JUST CAUSE blog as an environmental solution - and pitching Etsy as the only ethical way to be a consumer this holiday season.
http://tinyurl.com/326ucg
This is excellent, i just wish I had more bags....
SO much fun!! i love them! great holiday presents for my friends.. thanks so much for the tutorial!!!
yes don't forget to open a window!! (i kind of forgot the first time.. lol)
must try to fuse... now... i'm already addicted...
I love this idea. But - when I try this my waxed paper gets stuck to my bags and the bags curl. Any suggestions? What am I doing wrong?
You can get bags from the target guest services~ they keep all those bags from returns and are more than happy to give them too you and that they are recycled!!
I did this over the weekend- so easy and FUN. I wish I had a sewing machine because I would do it so much more. I used Parchment paper which felt a bit safer than wax and since I did a lot of layers set my iron pretty high and had to iron for a few minutes on each side.
Can't wait to do it again soon!
this is awesome! i am looking forward to trying this! thank you!
Has anyone else tried it with freezer paper? I did and the freezer paper melted to the bags so I had a big stiff sheet of plastic sandwiched permanently between two sheets of paper. (freezer paper has a layer of plastic fused on one side.
I'm guessing that freezer paper is not a good idea. Will try again with parchment or some other kind of plain paper.
I am just wondering about the unseen fumes and gases that are being released by this project. Does anyone know the science behind melting this kind of plastic? I think it is so cool. I want to make some too!
Anita said...
Great idea!!! You say "Parchment Paper," but the paper on the picture looks like wax paper. Can we use either one?
Amanda said...
I love this idea. But - when I try this my waxed paper gets stuck to my bags and the bags curl. Any suggestions? What am I doing wrong?
--Waxed paper has WAX, which has the virtue of a low melt point.
Don't forget, the original instructions also gave you the option of using plain old copy paper. If that's not big enough, go to a paper store and get a couple of big sheets. I use blank newsprint, which is very thin (making the process more efficient and quick) and has no ink to transfer to your board or iron.
I am so intrigued about this plastic fusing. I do have a question about when you sew it. Does it not rip on the dotted line of needle perforations? I would like to make a grocery tote.....any suggestions?
So fun! Thank you for posting clear photos. I used wrapping paper (plain side down) with a hot iron and 16 Target bags (and one Target holiday bag for birds) to construct a large tote inspired by a couple of love birds I know!! I just can't stop now... how 'bout those plastic fumes? A OK? -Just a thought!
Ok, look for the photo soon... I like it:)
I am looking forward to seeing the picture. Did you sew your tote or did you make the tote according to the size bags you had?
Yeah, I fused 8 layers together for each side and then sewed them together. I added a long fused bag strap that is lined with scrap cotton fabric. It measures 15"X13" (25" including the strap)
Great shoulder bag for light grocery shopping or a trip to the lake. Love it!
I made a feeble attempt to try this last night and the layers shriveled so fast there was no turning back....guess it was too hot! I'll try another time...until then...I'll read about others' success and learn where I went wrong.
I love this. It took a few tries to get the iron temp just right, and some trial and error with different types of paper, but I think I've got it down. I like the way the heavier (Target) bags fuse as opposed to the grocery store bags. They seem to wind up wrinkly. Here's a picture of the "bag" that I made. I'm almost embarrassed to post it, but it was just a first try. I'll be a pro at it in no time. My kids love this too...we're very into recycling, and my oldest loves to do the ironing part.
[IMG]http://i122.photobucket.com/albums/o241/sunshine0216/100_1136.jpg[/IMG]
Alright I am gonna give this a shot... it looks like SO much fun and such a great way to free up valuable real estate in my kitchen drawers!! I'll post more once I have my first results.
Okay I tried it and it's pretty fabulous so far! Nothing worth photographing or anything, but I am seeing so many possibilities!
What I have learned so far:
1.) Regular white printer/typing paper works great, but the size is limiting. I think I'll go get a roll of wrapping paper (as one poster suggested) from the barn tomorrow when it's light.
2.) I found that 3.5 (just a tad higher than the suggested setting for rayon on my iron) seems to work best.
3.) About 12 long seconds at a time per side (over any given area) seems about right to fuse the plastic layers without causing them to buckle and warp too much.
4.) I had better results when I was patient and didn't try to peek before it had a chance to cool down.
5.) Bubble wrap sandwiched between clear freezer bags comes out like snake skin or honeycomb.
6.) Old bits of wrapping ribbon, the kind you can curl, works well sandwiched between layers of clear also.
I'll keep experimenting and post an update later. I think I may try a bit of patchwork. This stuff makes me want a serger!
I just tried this for the first time last night - here's what I learned:
1. For me, the heavier target bags worked perfectly whereas lighter bags were hit or miss. Some worked, some didn't.
2. My cheapo ironing board caused hot spot where the plastic shrunk quicker than the rest. This was caused by the supporting metal rails that run lengthwise under the board. These strips were hotter than the thin metal of the rest of the board. I corrected this by keeping the iron in the same spot and pulling the bag across the board under the iron. That way the heat was always uniform.
3. Wax paper stuck to my plastic, but parchment paper worked great.
Thanks for the tutorial. I'm completely obsessed with this now. Working on my second jacket. I never thought I'd be so in favor of plastic bags.
-karen
I agree with joe:
1)parchment is preferred
2)rayon setting works best on my iron
3)target bag thickness works everytime
oo I bet those pretty doggie bags from Cheesecake Factory would be really pretty as a liner!
This post rocks my world. I'm definatly going to fuse together some of the hundreds of bags that I have in a crazy basement pile! I didn't want to throw them away and now I can make big bags and use them for my groceries without having to ever get more!!! So, very, very great! Thank you :o)
Can't wait to try this! Ever since I first saw a variant on this in Natural Home magazine in November, I've been saving the colourful bags from kids' clothing stores...
Anyway, I thought you all might be interested in this site:
http://www.bags2riches.co.uk/
It hasn't been updated in a while, but it looks like she's found a way to fuse the plastic into more rigid layers and form it into fantastic cuffs and CFL-only light fixtures... so. damn. cool.
I really appreciated all of the comments here. I was also having a hard time with some of the bags I was using. Here's what I found:
-Target bags are super easy to use.
-I actually had a really hard time using the cheaper bags.
was wondering, if u don't have a sewing machine, can you overlap edges? ie, instead of creating 'panels' using 6 'sheets' of bags, ironing, then sewing the resulting panels together...
take 3 sheets and 3 sheets and interweave to about a 1/2way mark; then iron the overlapping area only. interweave the 2nd 1/2 of the sheets with a new set of 3 sheets, etc...
will this work?
or do u (anyone? anyone? Bueller?) feel that once you start ironing, that you have to do the full sheet at once?
how long do u make this plastic bag?
I love this idea. I haven't tried it out yet, but have plenty of bags stockpiled. I have moved a few (few dozen) times so have plenty of large sheets of packing paper to try for the ironing.
Great idea. What size/type of needle do I use on my sewing machine and what kind of thread?
That is an awesome idea; I will start doing it soon also. It is definitely useful for biking in the rain.
And I have not seen a C-Town bag in ages since I left the south bronx. I kinda miss it, even if it was not the best around.
What a cool idea! I hate to spoil anyone's fun, BUT I think it should be mentioned that this should be done in a WELL VENTILATED area or that you use an organic vapor mask or a respirator. Melting and potentially burning plastics creates sometimes harmful fumes, some of which are linked with embryonic mutagens.
Better safe than sorry.
This is so creative. We have created some cool projects with crocheted patterns from waste plastic. All proceeds from sales of the items go towards supporting various world wide charitable projects.
http://amma.org/humanitarian-activities/nature/plastic-project.html
Thanks for the detailed tutorials.
Cheers...
Well Done. That is very clever. I will have to give it a go!
Has anyone else used a brown paper grocery bag instead of either parchment or wrapping paper? I tried it (non-inked side to the plastic) and it worked great.
I used newspaper, which is risky, but for me the ink didn't transfer to my ironing board or to the plastic bag.... like I said, it's risky, you might want to use brown paper instead. Just don't use freezer paper, it sticks to the plastic permanently. :-(
I am thinking about using this process to make bags that would hang on the backs of student chairs to keep books in.
I'd love to hear from someone who has given a tote some hard use to give me feedback about their durability. Although I foresee them only holding a paperback book, a spiral notebook and a couple folders, students are simply hard on things.
I would be designing and making 30 chair-back book bags this summer, which is too many not to have them survive for at least one school year. At $10+ each retail, I am VERY hopeful!
P.S. Point taken about the fumes. I am planning on working on the patio, outside! Any other tips are appreciated, btw.
I made a very durable grocery bag using this method, but I reinforced the seams by basically creating a border using nylon from an old windbreaker. You could recycle any sturdy fabric--check a thrift store or garage sale. I used the fabric from only one sleeve, so I am sure I could have made about eight from that one short jacket. I simply cut strips and stitched them as a border like a very wide bias tape around each large panel, then stitched them all together. I used a brown paper grocery bag for a pattern and added shoulder straps with the nylon. It works great, and I load it up with heavy groceries all the time. Good luck!
I created a sample chair-back book bag easily and successfully. The edge seams were fused together once, then folded over and fused again. This made the construction feel VERY durable. I don't think I'll need to sew any seams or add any reinforcement. The sample is in the classroom and students are encouraged to test it out so I can see how well it stands up to kids.
eva, I found that if the iron is too hot, the plastic sticks to the paper and will make holes. If it starts sticking, just let the paper/plastic combo cool. It will then easily peel off.
But what about the FUMES????!!!!!
I am a canary, of sorts. As a severe asthmatic, my senors are always on high alert to fumes, smells, and too many benign irritants. I made my single "mock-up" in a small, unventilated room, and was very surprised not to smell any fumes or "sense" any irritation. That said, I would not encourage working without ventilation, especially if you are at it for any length of time. When I make the classroom set, I plan to work outside.
Just made one today, thanks for the tutorial!
http://jyoseph.com/blog/detail.cfm/post/343
Don't overlook smaller bags that may appear to be too small to be of use.
You can use colourful small bags to cut out shapes from, such as pretty flowers and leaves or hearts etc.
You can then arrange the shapes or randomly sprinkle them over your fusing projects (on the top layer) to add a great fashionable and personalized touch, with endless pretty designs.
I just tried my first grocery bags fusing, and ended up with bunched up plastic. i used the rayon setting. what am doing wrong?
thats metal!
Your post reminded me of something we "used" to do with our favorite sewing patterns. I had a favorite pants pattern that was getting ragged from several uses. We took regular tissue paper on the ironing board, a layer of dry cleaner bag and then the pattern pieces. Step 2: iron. It makes the pattern more durable. I am guessing the plastic bags would work as well. RETHINK, REUSE, RECYCLE.
This tutorial is still very much promoted and I would like to link to it from my blog! There are not so many interesting bags here in Sweden but I need to have someone in the US send me some to do this!
this tutorial is amazing, thank you so much for explain it so clearly and simply.
An amazing tutorial. Now I'm not feeling as bad about forgetting my "green" bags when I get to Target. I can always make more from the stash I have. Can't wait to try this when it cools down outside. Don't want to asphyxiate my family. :-)
wow! Gotta try this at home :) A new project for the home buddy!
About the fumes;
Shopping bags are made of polyethylene, which is a combustible material. When you burn it, it breaks down into carbon dioxide and water. This is exactly how some municipalities deal with their LDPE "recycling"; they incinerate it. This is unlike polystyrene (styrofoam) that a cocktail of toxic vapors when burned. Burning PE plastic has the same hazards associated with it that burning wood and other combustible materials have. Inefficient combustion releases carbon monoxide, which can be deadly.
As long as your area is well-ventilated, you should be okay. I can't speak for the safety of the inks in the plastic, however.
I was in Target and noticed the re-bags they are making using this technique. Has anyone else noticed these?
Great tutorial. More on this and related ideas at Plastico Fantastico .
I am planning to try later today to make a sheet up and print on it. I think it will work. Wish me luck. Whoooeee, recycled plastic bag printing.
Excellent! Super!!
Thankyu!!!
;^J
oh thank you thank you thank you! i am doing a "30 Day No Trash Challenge" and something like this will really help me from suffocating on all of these non-recyclables...check it out!
notrashchallenge.blogspot.com
Question. I accidently fused one set of plastic bags to a freezer paper (don't use freezer paper over the plastic bags, but you can use newsprint, in my experience). Anyway... it gave me an idea. I have been making fabric shopping bags for myself (so that I don't bring home more plastic grocery bags), but they are floppy and mine don't fit in the frames that they use to hold plastic grocery bags up (when they are being loaded with groceries). Do you think it would be possible to fuse a few layers of plastic bags to the inside of some fabric to stiffen the fabric so that the bag will sort of stand up after it sewn? Do you know if anyone has tried this and if it is washable afterwards?
I am thinking about trying it out with something like canvas or cotton twill.
I noticed that people seemed to have better luck using Target shopping bags. In my area, Target bags are made from LDPE (low density polyethelene, #4 plastics), while most grocery shopping bags are HDPE (high density polyethelene, #2). Perhaps this is why some people are having better luck with this technique than others. I am anxious to experiment with this. It looks like fun!
Could I ask what is parchment paper? What is it made of and where to buy it?
Also, what is Freeze paper?
There are different kinds of parchment paper, I think they are referring to the kind that is used for some kinds of cooking (wrapping bits of chicken in paper and then baking it)
If you google "parchment paper" you will probably see that some stores that specialize in gourmet food sell it. You might find a roll of it in a grocery store. I think it's just a heavy paper. I used newspaper when I did it, it worked fine, but I suppose it could transfer ink onto some plastic.
DO NOT USE FREEZER PAPER. One side of freezer paper has a layer of plastic bonded to it, if you put this over the stack of plastic bags it will fuse the freezer paper to the stack of bags. I lost some nice bags that way the first time I tried it. If you iron on the plastic side it will stick to your iron. So I think whoever said use freezer paper must have had some kind of other freezer paper or didn't actually try it.
Anyone tried to wash in the machine?
I was thinking of trying to use fused plastic as a waterproof backing on bibs....
I'm sure there is flaw in my logic...
thoughts?
I made my first bag today out of a black bin bag with orange Sainsbury's bag handles. It looks pretty cool but it took so long that I had the iron on for about 3 hours. I don't think I helped the planet much...
This is a great idea at the perfect time here in Seattle. There is now a 25 cent per bag charge in our county. At least crafters can be philosophical. Where else can you get such cheap craft supplies.
Not only do I make em, I sell em too!
You do not say wether the iron should have steam?
I assume not?
I got good results with rayon setting too....cotton might bubble the plastic.
Have fun!
tramadol
tramadol
tramadol
tramadol
tramadol
tramadol
tramadol
tramadol
tramadol
tramadol
tramadol
tramadol
tramadol
tramadol
tramadol
tramadol
tramadol
tramadol
tramadol
tramadol
tramadol
tramadol
tramadol
tramadol
tramadol
tramadol
tramadol
tramadol
tramadol
tramadol
tramadol
tramadol
tramadol
tramadol
tramadol
tramadol
tramadol
tramadol
tramadol
tramadol
tramadol
tramadol
tramadol
tramadol
tramadol
tramadol
tramadol
tramadol
tramadol
tramadol
tramadol
tramadol
tramadol
tramadol
tramadol
tramadol
tramadol
tramadol
tramadol
tramadol
tramadol
tramadol
tramadol
tramadol
tramadol
tramadol
tramadol
tramadol
tramadol
tramadol
tramadol
tramadol
tramadol
tramadol
tramadol
tramadol
tramadol
tramadol
tramadol
tramadol
tramadol
tramadol
tramadol
tramadol
tramadol
tramadol
tramadol
tramadol
tramadol
tramadol
tramadol
tramadol
tramadol
tramadol
tramadol
tramadol
tramadol
tramadol
tramadol
tramadol
tramadol
tramadol
tramadol
tramadol
tramadol
tramadol
tramadol
tramadol
tramadol
tramadol
tramadol
tramadol
tramadol
tramadol
tramadol
tramadol
tramadol
tramadol
tramadol
tramadol
tramadol
tramadol
tramadol
tramadol
tramadol
tramadol
tramadol
tramadol
tramadol
tramadol
tramadol
tramadol
tramadol
tramadol
tramadol
tramadol
tramadol
tramadol
tramadol
tramadol
what a great idea! i never thought of doing this. thanks for the tutorial!
I can't wait to experiment with these! If all goes well I'm thinking about having my girls' Brownies troop collect the clean bags, then cut and layer them in a meeting while one or two of the parents iron them outside of our meeting location. It sounds like the fused material would be perfect for Sit-Upons and if we gather enough we can "donate" the material to the younger troops along with blunt yarn needles and kite string to make their own Sit Upons and maybe even make extra to sell at a Lemonade/Bake sale at our town sporting events!
Personally, I have so few of these bags at home, but am running errands this afternoon and will stop at my Target's guest services to collect some! My grandmother's also been saving up her bags in hopes that I'd have plans for them and have been thinking about collecting them in the spring to crochet into beach totes!
Thank you!
I tried this out but, had a bit of a problem. What will keep my freezer paper from sticking to the bags. I can't seem to peel the paper off of the bags. Help!
Did it have a plastic layer? Try using parchment paper. I really had good luck with old wrapping paper too. Keep trying, and don't forget to do it outside or near an open window :)
Willow
OK! Thanks for the tip. I actually went up a little further in the past comments and found that wax paper isn't a great way to go. I may even try computer paper to play it safe. Thanks again!
HVP
Thank you - this will be very useful! I have one of the fused bags from Target, that I got free because I sent in an envelope full of Target bags. Now I can make my own to extend the collection!
Fusing. . . eeeeexcellent. Here's what I want to know: one of those Etsy Lab photos WAY up there in the blog post shows a graphic that says "estylabs.com" in it. How was that achieved? Does etsy have its own plastic bags, or was a piece of paper inserted under a white layer of paper? Would it just get laminated and remain waterproof/washable?
It looks to me like they screen-printed the "etsy labs" logo on a plastic bag and then sandwiched a translucent white bag on top of it and added some more bags beneath it for thickness... at least that's how I would do it, if I could screen-print onto a plain plastic bag.
this is the new way. we can and will change the way the mass think. hong kong willie born green
amazing!
Some very cool stuff! The whole purpose here is to up-cycle the plastic bags that you've already accumulated... before you realized that plastic bags are so harmful to the environment and increase our dependency on petroleum products. PLEASE if you run out of plastic bags to fuse into cool stuff DO NOT get more at the store. If we all refused paper AND plastic bags and brought our own reuseable bags we could solve this problem once and for all. If you really must have more plastic bags for your project then ask your friends and neighbors for theirs and take the opportunity to explain what you're doing and hopefully they will stop consuming more plastic bags too!
excellent tutorial. i'm making a halloween wedding dress out of my plastic bags and I'll be going as the bride of plastic! hope it works out.
THANK YOU!!!! I've been trying (and FAILING MISERABLY) to fuse plastic bags without a tutorial for months. And this came just in time for making shopping bags to put Christmas presents in, too!
STOP-STOP-STOP MELTING THOSE PLASTIC BAGS!!!!!
Plastic bags are full of chemicals and when they are heated to a melting point they give off toxic fumes. The fumes may or may not have an odor but they are carcinogenic. You don't want to breathe them and you don't want them in your home. You especially don't want them in a home with children and pets. Opening a window will not get rid of the fumes fast enough.
The global atmosphere is not in very good shape right now and we as quilters and crafters need to do all we can to protect it as well as ourselves.
If you have too many plastic bags, take them to the grocery store and let the store sent them onto a recycler.
You can be Eco-friendly by making yourself a couple of fabric bags. You can also check out some of your favorite stores - they have some pretty cool eco bags at really low prices. Then you can just say "No Thanks" to plastic bags.
Sam Dallas, Texas
Certified Risk Manager
Environmental Industry
Interesting comment directly above. Now I'm questioning featuring this idea as part of our Homemade Christmas Gift Guide =/
Sanitary grocery bags foster dependence on the petroleum industry? That's a pretty ignorant statement. They're made from ethylene, a by-product of natural gas.
If you want to waste precious potable water washing your cloth bags everytime your groceries leak, that's your conscience, but don't force your ignorant, unsanitary, earth-destroying beliefs on the rest of us please.
I just made this!!! I am not the best seamstress in the world but I had to do this.... I do need some help with the handle since I have a regular ol' sewing machine. I did not use a pattern I just did it!!!
http://s21.photobucket.com/albums/b290/fuzzy05/?action=view¤t=IMG00663.jpg
Hello people,
How do you attach the squares of material together? is it better to melt/fuze them to eachother or to sew them.
I did mine with my sewing machine but I have heard of people fusing together with an iron. good luck
In answer to HeatherRadish :
http://www.reusablebags.com/facts.php?id=2&display=print
Washing a cloth bag is still much better than using a lot of energy to make and ship new non-biodegradable ones all the time, don't you think ?
Could someone add color-dye to change the looks of regular plastic bags and mostly, HOW?
Today, the Microsoft-owned in-game ad agency said that it has signed an exclusive multiyear agreement with Blizzard. Azerothians opposed to seeing in-game ads in their localworld of warcft goldwatering holes need not worry, however, because the deal is limited to Blizzard's Web sites and Battle.net,the game maker's online-gaming hub. Terms of the deal were not announced, but Massive did note that the agreement is applicable to users in the US, Canada, Europe, South Korea, and Australia.
buy wow gold
Fusing plastic is so much fun. When I Chinese culture|
Hair design|
Gourmet cooking|
Financial crisis|
movie stars|
Hair design|
Lose weight|
Gold prices|
Olympic Games|
Worldstock markets|go shopping now I am more excited about the bags than what I bought.
悲喜曆法
http://bingyi.somebodiesblog.com/
http://www.kaosblog.com/bingyi/
http://www.iseekblog.com/bingyi/
http://www.myblog.gr/bingyi/
http://www.beklo.com/bingyi/
http://bingyilg.desiblogz.com/
http://bingyi.blogs.videoproductionhelp.com/
http://www.enequist.dk/bingyi/
http://xenista.com/bingyi/
http://bigworldclub.com/blog/bingyi/
上劃線
Fashion Jewelry|
Fashion life |
Fashion life |
Slimming diet |
Fashion Daren |
Fashion Daren |
Slimming diet |
Hair design |
Hollywood star photos |
Hair design |
aztec pyramid pay slot the game|
aztec slot machine|
aztec slots for free|
aztec temple and slot machine and bonus game and payout|
aztec temple slot|
aztec temple slot machin|
aztec temple slot machine|
babooshka slot|
babooshka slot machine|
babooshka slots online|
baby sloth bear|Sitemap|
slot machine casino|
babooshka slot|
american bandstand slot machines|
antelope slot canyon|
antique aristocrat slot for sale|
antique gum ball slot machines|
antique slot machine part|
antique slot machine parts|three-toed sloth costa rica|
thunderjet slot cars|
time card mail slot|
tips for slot machine play|
tips for slot machine players|
tomy afx slot cars|
top free slots|
totally free slot machines|
turning slotted brake rotors|
two toed sloth behavior|
two toed sloth economic status|
two toed sloth habitat|
two toed sloth human effects|
tyco ho slot cars|
usb multi slot card reader|
used and new slot machine sales|
used frog prince slot machine for sale|
used slot machine|
used slot machine for sale|win at slot machine|
win at slot machines|
win slot|
win slot machine|
wine bottle opener slotmachines|
winning at mr money bags slots|
winning at slot|
winning at slot machine|
winning at slot machines|
winning slot machine|
wizard of oz slot game online|
wizard of oz slot machine|
wizard of oz video slot pc games|
wizzard h o slot cars|
Cheap Nike Shoes, Air Jordan Shoes are on sale now, our Air Jordan, Nike Shoes are exclusive
Buy Jordan Shoes, Nike Dunks, Dunk Shoes, SB Kicks, Nike Air Force One 1, Bape Hoodies Hoody, Jordan Kicks, Nike Kicks, Nike Air Max, Dunks Shoes, Nike Shox
fashion life|
Hollywood star|
The latest film|
The latest film|
The latest film|
Christmas economy|
The latest film|
fashion life|
Fashion life|
The latest film|
Jesus never let me downNo one here to blameNo one to point the fingerThe High Street never looked so lowIt's lifeyou never knew it could beplace my life beginsday after daywhat my life would bewill i ever seeyou smiling back at just fade awayyou speak to my hearti'm too proud to lose
who look and think like youea86time pass awayget you off my mindi hide it insidei keep on searchingthe courage to showtaking the easy way outia86's blogai86ps blogUz86's journalZn86's journali'm too shy to asksooner or laterholding you close to meyou wander far from meI believe in you
bl86's blurtyIt's just youWould everything be alrightit's hard to get in the doorI don't need to lieI don't want to promiseI'll Always Stay AroundThis Is The BeginningYou know i seek u flying without wingsimpossible as they may seemhow will i knowHow deep is your lovewhere will u go whatever love you is true
The latest film|
明星動態|
Slimming thin|
Slimming thin|
Slimming thin|
Slimming thin|
Slimming thin |
The latest film|
Slimming thin|
The latest film |
fashion life|
Hollywood star|
The latest film|
The latest film|
The latest film|
Christmas economy|
The latest film|
fashion life|
Fashion life|
The latest film|
The latest hair style |
The most popular wedding |
The world's Wedding |
Popular wedding |
Personalized Wedding |
Personalized Wedding |
Miss World |
Fashion Daren |
Shoutui weight loss |
Shoutui weight loss |
Crosstraining, freeclimber legs by law |
Fashion Daren |
Hollywood film |
Hollywood film |
Hollywood star |
Hollywood star |
Hollywood star |
Hollywood film |
Hollywood film |
Hollywood star |
Hollywood star |
Hollywood star |
Hollywood star |
Hollywood star |
Hollywood star photos |
Slimming diet |
Slimming diet |
Popular hairstyle |
Popular hairstyle |
Slimming diet |
Fun games |
World luxury cars |
Hair design |
World luxury cars |
Fashion designer |
World model |
World model |
World model |
Popular wedding |
Popular wedding |
一个十几岁的打工妹,竟然就创造了这样一个感天动地的故事。然而,她不过是打工妹海洋里的一朵浪花。诗人说:比山大的是海,比海大的是天,比天大的是心。千万颗打工妹的心,该包容何等精彩的宇宙啊?无缝钢管多么艰苦的一项工作啊有时连一个年轻的大汗都不 愿意做这项工作,可在一家无缝钢管厂里我却发现了好多年轻打工妹忙碌的样子!以前我去过山东无缝钢管厂和天津无缝钢管厂在那里做这项工作的女性都很多,据了解他们生产的产品技术和质量都是一流,有一个叫某某某的打工妹就凭自己良好的技术发家致富!很多商报都报道过她的事情。现在市场上大多的钢管都打着山东无缝钢管和天津无缝钢管标签。现在在各行各业很多高难度高体力的岗位上都有她们亮丽身影!据了解像真空机组,储罐,冷凝器,消声器等一些机械类的工厂里都有好多来自农村的打工妹!诗人说:比山大的是海,比海大的是天,比天大的是心。千万颗打工妹的心,该包容何等精彩的宇宙啊!今后,对打工者要么不看,要看,就要诚心正眼地看。对许多人和许多事都可以“熟视无睹”,惟独对他们,不能!
Tbcgold est un site webdofus kamaschanger la monnaie virtuelle pour que vous, notre client, gagniezwow golddes meilleures expériences dans ce jeu !
film izle | sinema izle
online film izle online sinema bedava film izle
Cool as this might be, I highly recommend NOT risking your health for this project. Although Joel is right in that polyethylene breaks down to just CO, CO2, and carbon particles (same as in combustion of any hydrocarbon), plastic bags contain more than just PET. Heating plastic bags is a quick an efficient way to release the phthalates which make the bags soft and stretchy, as well as a host of carcinogenic and all around toxic chemicals from the colorants and inks. Exposure to these chemicals can lead to development of chemical sensitivities and other allergies, even in a short time, among other health problems now and over time. Obviously you don't have to smell these chemicals to be affected by the levels created in such a project.
Don't do this project unless you are working under a fume hood!
buy wow gold
cheap wow gold
There is a lot of aion online gold in the game,if you want to have them you can come to play the game. I think you will also like to play the game and you will try your best to earn the aion gold as you can.I like to earn the aion money,because if i have them i can go to buy equipment and i also can go to buy aion gold. if you want to play it, please cheap aion gold and join us. Please do not hesitate to play the game,i believe you will like it too.
stainless steel bracelet wholesale
Our jewelry company is mainly business in stainless steel bracelet wholesale trade; we offer you a range of stainless steel bracelet wholesale. You can do stainless steel bracelet wholesale trade in our store, in any time any occasions we offer you the most favorable stainless steel bracelet wholesale and the highest quality stainless steel bracelet wholesale to you when you do stainless steel bracelet wholesale in here, choose us we will offer you the best. and we also supply the titanium jewelry wholesale
tungsten jewelry wholesale
fashion jewelry wholesale
stainless steel bangle wholesale
stainless steel necklace wholesale
stainless steel pendant wholesale
stainless steel earring wholesale 5
stainless steel ring wholesale
These new Cheap car DVD players are ideal for entertainment on the move, offering multi-format playback and extended battery life via their rechargeable battery or power from a car! Furthermore, electronic skip protection ensures that during a bumpy flight or along a bumpy road, the DVD players will continue offering excellent image and sound quality. and we also supply the Portable car DVD player
Cheap unlocked GSM phones
cheap Cell phone watch
我想去云南,先咨询云南旅游
丽江旅游
云南旅游线路
云南旅行社
云南景点
云南旅游网
云南旅游景点
丽江旅行社
丽江旅游
云南旅游价格
昆明旅行社
昆明旅游
云南旅游
云南昆明旅游
云南旅行社
云南旅行社
云南会议
云南会议旅游
云南旅游
昆明旅游网
大理旅游
丽江旅游
腾冲旅游
香格里拉旅游
西双版纳旅游
昆明旅游
大理旅游
丽江旅游网
腾冲旅游
香格里拉旅游
西双版纳旅游
昆明旅游
大理旅游
丽江旅游网
腾冲旅游
香格里拉旅游
西双版纳旅游
台湾旅游
马尔代夫旅游
日韩旅游
海南旅游
广西旅游
西藏旅游
北京旅游
四川旅游
港澳旅游
欧洲旅游
巴厘岛旅游
九寨沟旅游
Tomica Minichamps
Mini-Z Kyosho Futaba RCtank Choro-Q Ebbro Tiger
I Silyerlit Radiocontrol
Tamiya Tomy Cars Model Tamiya Ebbro Kyosho Mini-Z Tomica .
. .
.
.
.
.
.
.
.
.
.
.
.
.
.
.
.
.
.
.
.
.
.
.
.
.
.
.
.
Tomica
Tomica
Tomica
Tomica
Minichamps
Minichamps
Minichamps
Minichamps
Minichamps
Mini-Z
Mini-Z
Mini-Z
Mini-Z
Kyosho
Kyosho
Kyosho
Kyosho
Kyosho
Futaba
Futaba
Futaba
Futaba
Choro-Q
Choro-Q
Choro-Q
Choro-Q
Ebbro
Ebbro
Ebbro
Ebbro
Ebbro
Ebbro
Tomica
MIni-Z
Minichamps
Choro-Q
Kyosho
Tiger I
RC tank
RC bearing
car model
Futaba
Tomica
Minichamps
Tiger I
Tomica
Minichamps
Choro-Q
Mini-Z
Kyosho
Futaba
RC tank
Minichamps
Mini-Z
Tomica
Kyosho
Minichamps
Futaba
Choro-Q
Tomica
Mini-Z
Tomica
Minichamps
Tomica
Mini-Z
Kyosho
Minichamps
RC Tank
RC Tank
Mini-Z
Tomica
Mini-Z
Minichamps
Futaba
Futaba
Tomica
Minichamps
Mini-Z
Futaba
Mini-Z
Futaba
Tomica
Kyosho
Mini-Z
Tomica
MIni-Z
Futaba
Mini-Z
RC Tank
Futaba
Minichamps
Mini-Z
Mini-Z
Futaba
Futaba
RC Tank
RC Tank
Choro-Q
Choro-Q
Choro-Q
Choro-Q
Choro-Q
Choro-Q
Choro-Q
Choro-Q
Choro-Q
Choro-Q
Choro-Q
Choro-Q
Choro-Q
Choro-Q
Choro-Q
Choro-Q
Choro-Q
Choro-Q
Choro-Q
Choro-Q
Choro-Q
Choro-Q
Choro-Q
Choro-Q
Choro-Q
RC Tank
RC Tank
RC Tank
RC Tank
RC Tank
RC Tank
RC Tank
RC Tank
RC Tank
RC Tank
RC Tank
RC Tank
RC Tank
RC Tank
RC Tank
RC Tank
RC Tank
RC Tank
RC Tank
RC Tank
RC Tank
RC Tank
RC Tank
RC Tank
RC Tank
weight loss pills
penis pills
penis enlargement
http://gm-free.enFrland.com
http://play-es.enFrland.com
http://rings.enFrland.com
http://wow.enFrland.com
http://champion.enFrbar.com
http://download.enFrbar.com
http://hunter.enFrbar.com
http://ign-arena.enFrbar.com
http://live.enFrbar.com
http://loot-tips.enFrbar.com
http://gm-free.enFrland.com
http://play-es.enFrland.com
http://rings.enFrland.com
http://wow.enFrland.com
http://champion.enFrbar.com
http://download.enFrbar.com
http://hunter.enFrbar.com
http://ign-arena.enFrbar.com
http://live.enFrbar.com
http://loot-tips.enFrbar.com
The Requiem shows up so many cool pictures that got me thinking a lot. And I really mean that a lot of requiem gold is very important and required. First off if the name is not taken the name and some requiem lant of book Requiem I do not if it is allowed to name a book. Some requiem money will well enough chatting better go and write this book. Comment on this please should I write this book or not. See you. In Requiem, there is blood. Monsters, blood, bigger monsters, and yes, more blood and need cheap requiem lant. You know what that requiem online gold means; there are factions, races changing sides, and all out war.
Western brand product with Wholesale price, such as nike air Jordan shoe, nike SB dunk shoe, cheap handbag, fashion lady boot,wool UGG boot, competitive price wallets,high quanlity watch.
Website: www.western-brand.com
[url=http://www.meinwowgold.de/Faq.aspx/]FAQ[/url]
[url=http://www.meinwowgold.de/NewsList.aspx/]Aktuelle News[/url]
[url=http://www.meinwowgold.de/support.aspx/]Support[/url]
[url=http://www.meinwowgold.de/FinalFantasyXI_All_gold_list_27.html/]Final Fantasy XI[/url]
[url=http://www.meinwowgold.de/GuildWars_All_gold_list_17.html/]Guild Wars[/url]
[url=http://www.meinwowgold.de/GameCard_All_gold_list_30.html/]Game Card[/url]
[url=http://www.meinwowgold.de/Vanguard_All_gold_list_16.html/]Vanguard[/url]
[url=http://www.meinwowgold.de/AgeofConan(USA)_All_gold_list_28.html/]Age of Conan - US[/url]
[url=http://www.meinwowgold.de/AgeofConan(EUR)_All_gold_list_29.html/]Age of Conan - EU[/url]
[url=http://www.meinwowgold.de/WorldofWarcraft(USA)_All_gold_list_15.html/]World of Warcraft(USA)[/url]
[url=http://www.meinwowgold.de/WorldofWarcraft(EUR)_All_gold_list_1.html/]World of Warcraft(EUR)[/url]
[url=http://www.meinwowgold.de/LordofRings(USA)_All_gold_list_24.html/]The Lord of the Rings OL - USA[/url]
[url=http://www.meinwowgold.de/LordofRings(EUR)_All_gold_list_19.html/]The Lord of the Rings OL - EUR[/url]
I have never done this before, but it looks like a great idea (I can only handle so much crocheting plastic bags together before my hands ache and I feel irritated by the results) but I don't really sew much, can you stitch through these by hand with needle and thread, I was thinking of hand-stitching to put them together to make some nice grocery shopping totes. Any ideas?
I'm sure you could sew this by hand, but it will take much longer and won't be as strong as a seam on the machine.
It is too bad to see this cool post attacked so badly by the spambots. I'm hoping Etsy will come back and clean up the comments a bit for posterity!
摸摸耳免費遊戲
免費算前世今生
勁舞團官方
茂伯msn
歌詞帝國
田中千繪寫真
黑糖群俠傳影片
sony 主題|
影音之星|
陳庭妮 blog|1
foxy音樂網
侯高佼杰
舊鐵橋溼地公園收录
張露 wma
小野真弓
廖婉絨消脂茶
寇家瑞blog
派屈克史威茲11
米爾莎
陳信寰
平水相逢|
timer software
摸摸耳免費遊戲
免費算前世今生
勁舞團官方
茂伯msn
歌詞帝國
田中千繪寫真
黑糖群俠傳影片
sony 主題|
影音之星|
陳庭妮 blog|1
foxy音樂網
侯高佼杰
舊鐵橋溼地公園收录
張露 wma
小野真弓
廖婉絨消脂茶
寇家瑞blog
派屈克史威茲11
米爾莎
陳信寰
平水相逢|
timer software
Designer Watch|
Cool Watches|
Buy Watch|
Copy Watches|
Sport Watches|
Wrist Watches|Fake Watches|
=|
=|
=|
=|
=|
=|
=|
=|
=|
=|
=|
=|
hello,i have a wow gold guild blog,you can check wow gold reviews,guides there.Also you can go for wow gold
tiffany jewelry, 640-822.
Exam4Sure provides high quality IT exam practice questions and answers. We recommend some hot exams for you: vcp-310, MB7-517, 642-446, 642-975, 642-587, 646-976, 642-523 and 646-230.
無名正妹牆| 塔羅牌占卜| ng內衣|威力彩走勢圖|
楓之谷小遊戲|遊戲天堂|姓名配對指數|行政院人事行政局|國泰人壽保險|女人我最大|lv 名牌包包照片|燦星旅遊|無敵珊寶妹影片|麥當勞優惠券|台灣銀行網路|Fashion home|平水相逢|Fashion home|星座|==|??|·| ……|*|·|¥|*|·|*|#|·|¥|……|—|%|*|—|+|·|%|—|—|¥|—|R|·|#|%|#|·
|#|……|
·|·|#|……|·|……|%|
無名正妹牆| 塔羅牌占卜| ng內衣|威力彩走勢圖|
楓之谷小遊戲|遊戲天堂|姓名配對指數|行政院人事行政局|國泰人壽保險|女人我最大|lv 名牌包包照片|燦星旅遊|無敵珊寶妹影片|麥當勞優惠券|台灣銀行網路|Fashion home|平水相逢|Fashion home|星座|==|??|·| ……|*|·|¥|*|·|*|#|·|¥|……|—|%|*|—|+|·|%|—|—|¥|—|R|·|#|%|#|·
|#|……|
·|·|#|……|·|……|%|
Latest news|
Latest news|
Fashion apparel|
wedding dress|
Latest news|
Hollywood star|
Hollywood star|
Hollywood star|
Fashion apparel|
World famous brand watches|
On-line games|
On-line games|
Chinese oil painting|
Entertainment News|
World famous brand watches|
Fashion life|
yoyo|
World watches|
Fashion life|
Fashion life|
Hollywood fashion|
Hollywood star|
Online games|
yoyo|
World famous brand watches|
Hollywood fashion|
By the financial crisis|
On-line games|
European and American songs|
徵信社, 感情挽回, 婚姻挽回, 挽回婚姻, 挽回感情, 徵信, 徵信社, 徵信, 捉姦, 徵信公司, 通姦, 通姦罪, 抓姦, 抓猴, 捉猴, 捉姦, 監聽, 調查跟蹤, 反跟蹤, 外遇問題, 徵信, 捉姦, 女人徵信, 外遇問題, 女子徵信, 外遇, 徵信公司, 徵信網, 徵信, 徵信社, 外遇蒐證, 抓姦, 抓猴, 捉猴, 調查跟蹤, 反跟蹤, 感情挽回, 挽回感情, 婚姻挽回, 挽回婚姻, 感情挽回, 外遇沖開, 徵信, 徵信, 徵信社, 抓姦, 徵信, 徵信社, 外遇蒐證, 外遇, 通姦, 通姦罪, 贍養費, 徵信, 徵信社, 徵信社, 抓姦, 徵信社, 徵信社, 徵信, 徵信社, 徵信, 徵信, 徵信公司, 徵信社, 徵信, 徵信公司, 徵信社, 徵信社, 徵信社, 徵信社, 徵信社, 徵信, 徵信公司, 徵信社, 徵信, 徵信, 徵信公司, 徵信, 徵信社, 女人徵信, 外遇, 外遇, 外遇, 外遇
徵信, 徵, 徵, 徵, 徵, 徵, 徵, 徵, 徵, 徵, 徵, 徵, 徵, 徵, 徵, 徵, 徵, 徵, 徵, 徵, 徵, 徵, 徵, 徵, 徵, 徵, 徵, 徵, 徵, 徵, 徵, 徵, 徵, 徵, 徵, 徵, 徵, 徵, 徵, 徵, 徵, 徵, 徵, 徵, 徵, 徵, 徵, 徵, 徵, 徵, 徵, 徵, 徵, 徵, 徵, 徵, 徵, 徵, 徵, 徵, 徵, 徵, 徵, 徵, 徵, 徵, 徵, 徵, 徵, 徵, 徵信, 徵信網, 徵信社, 徵, 徵, 徵, 徵, 徵, 徵, 徵, 徵, 徵, 徵, 徵, 徵, 徵, 徵, 徵, 徵, 徵, 徵, 徵, 徵, 徵, 徵, 徵, 徵, 徵, 徵, 徵, 徵, 徵, 徵, 徵, 徵, 徵, 徵, 徵, 徵, 徵, 徵, 徵, 徵, 徵, 徵, 徵, 徵, 徵, 徵, 徵, 徵, 徵, 徵, 徵, 徵, 徵, 徵, 徵, 徵, 徵, 徵, 徵, 徵, 徵, 徵, 徵, 徵, 徵, 徵, 徵, 徵, 徵信,徵信網, 徵信, 徵信社, 外遇, 徵信, 徵信, 徵信社, 抓姦, 徵信, 徵信社, 外遇, 徵信, 徵信社, 徵信社, 徵信社, 抓姦, 徵信社, 徵信社, 徵信, 徵信社, 徵信, 徵, 徵信公司, 徵, 徵, 徵, 徵, 徵, 徵, 徵信, 徵信公司, 徵信社, 徵, 徵, 徵, 徵信, 徵信公司, 徵信社, 徵信, 徵, 徵, 徵, 徵, 徵信, 徵信社, 徵信公司, 徵, 徵, 徵, 徵信, 徵信社, 徵, 徵, 徵, 徵, 徵, 徵, 徵, 徵, 徵, 徵, 徵, 徵, 徵, 徵, 徵, 徵, 徵, 徵, 徵, 徵, 徵, 徵, 徵
遊戲口帶|
永豐銀行信用卡|
鉅亨網全球股市|
中英氣象局|
樂透彩開獎|
招桃花方法|
勵志小語|
台灣大哥大來電達鈴|
電腦桌布|
樂透彩中獎號碼|
線上遊戲|
方亭blog|
錢映伊ktv|
陳雲林來台|
台灣之歌dvd|
曾馨瑩懷孕|
小室哲哉keiko|
柴璐部落格|
歐巴馬演說|
平水相逢|
The latest Korean dramas |
The latest Korean dramas |
The latest Korean dramas |
The United States market |
The United States market |
American Star |
American Star |
The United States electrical |
The United States electrical |
U.S. economy |
U.S. economy |
U.S. economy |
United States Apartment |
United States Apartment |
Hollywood stars |
Hollywood stars |
Hollywood stars |
Hollywood economy |
Hollywood economy |
Hollywood economy |
……|
……|
#|
·|
·|
·|
·|
·|
·|
·|
·|
·|
·|
·|
·|
·|
·|
·|
·|
·|
·|
·|
·|
·|
·|
·|
·|
·|
·|
·|
·|
·|
·|
·|
·|
·|
·|
·|
·|
·|
·|
·|
·|
·|
·|
google排名优化,google排名查询,提高google排名,如何提高google排名,google排名规则,google排名网,google左侧排名优化,google左侧排名价格,北京google左侧排名,宁波google左侧排名,南京google左侧排名,杭州google左侧排名,北京seo培训,深圳seo培训,seo培训教程,seo培训中心,广州seo培训,淄博seo培训。
google排名优化,google排名查询,提高google排名,如何提高google排名,google排名规则,google排名网,google左侧排名优化,google左侧排名价格,北京google左侧排名,宁波google左侧排名,南京google左侧排名,杭州google左侧排名,北京seo培训,深圳seo培训,seo培训教程,seo培训中心,广州seo培训,淄博seo培训。
google排名优化,google排名查询,提高google排名,如何提高google排名,google排名规则,google排名网,google左侧排名优化,google左侧排名价格,北京google左侧排名,宁波google左侧排名,南京google左侧排名,杭州google左侧排名,北京seo培训,深圳seo培训,seo培训教程,seo培训中心,广州seo培训,淄博seo培训。
台灣政壇奧斯卡|
菲爾普斯女友|
倪嘉亨blog|
周幼婷寫真|
安志杰 blog|
joker袋鼠車|
李嘉欣圖片| d
哈德遜河上的奇蹟|
安志杰 tank|
2009春天吶喊|
聖嚴法師名言|
聖嚴法師的文章|
kitty袋鼠車|
張東健作品|
2009台灣燈會|
聖嚴法師圓寂|
川藏第一美女|
工藤靜香婚禮|
張東健的圖片|
元和雅醫學美容|
全球最年輕變性人|
元和雅診所|
聖嚴法師語錄|
楊巧寧34d|
buy sneakers
sneaker buy
buy cheap sneakers
buy air force one shoes
jordan fusion shoes
wholesale underwear
nike shox shoes
dunk shoes
nike max shoes
nike max 2009 shoes
UGG boots
addidas shoes
jordan kids shoes
nike kids shoes
brand clothing
coogi hoodies
coogi jeans
coogi tshirts
Christian Audigier hoodies
Christian Audigier jeans
Christian Audigier tshirts
ed hardly hoodies
ed hardly jeans
ed hardly tshirts
brand sunglasses
coach handbags
chanel handbags
gucci handbags
lv handbags
brand belts
big sizes jordan shoes
sizes 14 jordan shoes
sizes 15 jordan shoes
rolex watches
timberland boots
nike air force one 25th shoes
affliction tshirts
evisu hoodies
armani jeans
wholesale prada shoes
buy sneakers| sneaker buy| buy cheap sneakers| buy
air force one shoes| jordan fusion shoes|
wholesale underwear| nike shox shoes| dunk shoes| nike max shoes| nike max 2009 shoes| UGG boots
addidas shoes|
jordan kids shoes| nike kids shoes| brand clothing| coogi
hoodies| coogi jeans| coogi tshirts| Christian Audigier hoodies| Christian Audigier jeans| Christian Audigier tshirts| ed
hardly hoodies| ed hardly jeans| ed hardly tshirts| brand sunglasses| coach
handbags| chanel handbags| gucci handbags| lv handbags| brand belts| big sizes jordan shoes| sizes 14 jordan shoes| sizes 15
jordan shoes| rolex watches| timberland boots| nike air force one 25th shoes| affliction tshirts| evisu hoodies| armani jeans| wholesale prada
shoes
NEW YORK (Reuters) – Like many children wow power levelingof any faith Roger Bennett and Josh Kun found the religious instruction of their youth boring and irrelevant.But wow powerlevelingsomething must have seeped in because decades later while collecting kitschy Jewish album coverswow leveling they uncovered musical and cultural gems that could have redeemed Hebrew School.Their discoveries are recorded in a new book "And You wow power levelingShall Know Us By the Trail of Our Vinyl," -- a compilation of Jewish record albums from the 1940s through the 1970s."My frustrationwow powerleveling with Hebrew School was that it didn't speak to who I was or who I wanted to be. It didn't engage with life outside of Hebrewtales of pirates gold School," said Kun.One of their finds, a mambo-style 1959 album called "Bagels and Bongos", might have spiced things up in synagogue,silkroad gold while "Corned-Beef Confucius," by Max Asnas from the 1950s, could have provided some laughs.But Bennett and Kun insist the book is more than a nostalgic look at Jewish popular culture. It is a point of departure into a future silk road goldthat will be enriched by an infusion of the past.Q: Why a book all about records?Bennett: "Everyday objects tell stories that aremmporpg more powerful than people think at first glance. We can use objects to frame questions to make people think about online gameswho they are, what they're inheriting and what it means to them."Kun: "People look at this and say, 'Why does this matter?' Our work hasage of conan gold been to tell people why. One of the most fun things about this project has been translating this love into terms people age conan goldcan understand."Q: How did you go about collecting all of these records?Kun: "The work we've done with this music up to this point has been done as a small nonprofit, a labor of love. We devoted as much time as we could, taking weekends, stopping by age of conan power levelinggarage sales and meeting with musicians."Bennett: "We do feel a sense of urgency because these people are passing away."Q: Who was an exceptionally surprising and satisfying find?Bennett: "Jon Yune. Only in America could a Korean immigrant do a record of Hebrew and Yiddish songs. He still closes every one of his Vegas shows with "Exodus" because it not only reminds him of his relationship to Jewish music. He sees in Jewish history a parallel to the suffering of his own people."Q: What didaoc gold this book teach you about post-war Jewish popular culture?Bennett: "When we thought of Jewish music we thought of the holy trinity of Barry (Manilow), Barbra (Streisand) and Neil (Diamond). But we discovered a whole world. That framed one giant question, which was why had we never heard of any of this stuff? What's left out is so compelling. Ultimately this is aoc power levelingnot a book about music. aoc levelingIt's about how four generations lived in America diablo 2 cd keyand using the albums to tell history."Q: So putting this book together put your own Jewish identity in a different light?Bennett: "This book began by us diablo 2 cd keyjust collecting orphaned vinyl and then trying to track down as many of the performers as we can find. We have found role models in talking to them. daoc goldI felt like neither of us had a friend under 80!daoc plat I've found Jewish role models that are fascinating, extremely compelling, articulate -- that I wish I'd had at Hebrew School." (Reporting by Helen Chernikoff; editing by Patricia Reaney)
Hello everyone, bless everyone in the new year, bullish, come true.
.|.|.|.|.|.|.|.|.|.|.|.|.|.|.|.|.|.|.|.|. |T. |. |. |. |. |. |. |. |. |. |. |. |. |. |. |.|. |. |. |……|……|#|·|·|·|·|·|·|·|·|·|·|·|·|·|·|·|·|·|·|·|·|·|·|·|·|·|·|·|·|·|·|·|·|·|·|·|·|·|·|·|·|·|·|
wholesale jewelry
wholesale handmade jewelry
wholesale fashion jewelry
wholesale costume jewelry
handmade jewelry
fashion jewelry
costume jewelry
jewelry wholesale
wholesale pearl
wholesale crystal
discount jewelry
cheap wholesale
china jewelry wholesaler
wholesale china jewelry
handcrafted jewelry
wholesale jewellery
wholesale jewellery
handmade jewellery
hand made jewelry
wholesale beads
無名正妹牆| 塔羅牌占卜| ng內衣|威力彩走勢圖|楓之谷小遊戲|遊戲天堂|姓名配對指數|行政院人事行政局|國泰人壽保險|女人我最大|lv 名牌包包照片|燦星旅遊|無敵珊寶妹影片|麥當勞優惠券|台灣銀行網路|Fashion home|平水相逢|Fashion home|星座|==|??|·| ……|*|·|¥|*|·|*|#|·|¥|……|—|%|*|—|+|·|%|—|—|¥|—|R|·|#|%|#|·|#|……|·|·|#|……|·|……|%|
金銘長大|
娘家王燦|
舍利花舍利子|
心型愛人島|
彩色珍珠奶茶|
秒殺麵包|
錢韋杉婚紗照|
錢韋杉懷孕照|
江語晨部落格|
宮澤理惠|
余康蘶blog|
獨角鯨|
沈玉萍照片|
金銘旅行社|
田中聖最新shop照|
網路試衣間|
桃花牆|
侯炳瑩部落格|
侯炳瑩部落格|
侯炳瑩的男友|
黃騰浩部落格|
北川景子桌布|
北川景子|
nice blog........
In Mabinogi, players like to trade with mabinogi gold at Dunbarton. I still can remember lots of people gathered in front of the bank chatting, trading, playing to exchange cheap mabinogi or doing something funny. But if you wanted to buy mabinogi gold, you should keep a good relationship with her. We can buy mabinogi online gold and team mission scroll here and learn arrow revolver by a certain title. We can find lost property here and buy team mission scroll and mabinogi money, Aeira says she is a cold woman.
Heath said that NC Soft could counterbalance loosed by improving on established gw gold services for games. With the online games business of using necessary GuildWars Gold, it is all about growing your subscriber base. It will also enable extra Guild Wars Gold and features such as voice mail. We will be able to offer our players a commanding set of communication tools and also some GuildWars money. I have a feeling all I will be doing is sitting and pvping with cheap gw gold.
This blog is really a love
.| .| .|.|.|.|.|.|.|.|.|.|.|.|.|Fashion home|.|Fashion home|.|==|??|·| ……|*|·|¥|*|·|*|#|·|¥|……|—|%|*|—|+|·|%|—|—|¥|—|R|·|#|%|#|·|#|……|·|·|#|……|·|……|%|.|.|.|.|.|.|.|.|.|.|.|.|.|.|.|.|.|.|.|.|. |T. |. |. |. |. |. |. |. |. |. |. |. |. |. |. |.|. |. |. |……|……|#|·|·|·|·|·|·|·|·|·|·|·|·|·|·|·|·|·|·|·|·|·|·|·|·|·|·|·|·|·|·|·|·|·|·|·|·|·|·|·|·|·|·|
=========================================
The world of Warcraft gold sales (wow power leveling), to create the world's best site integrity! The cheapest (wow gold), the most efficient supplier of services, (wow power leveling) faster than real-time distribution, you can also find (wow gold) guide, (wow power leveling) skills, (wow gold) video, (powerleveling) Screenshots, (power leveling) wallpaper here! buy wow gold cheap power leveling Cheapest power leveling Buy here wow powerleveling Buy here cheap power leveling Buy here cheapest wow powerleveling Can also come here to buy wow powerleveling Can also come here to buy cheap powerleveling Can also come here to buy cheapest wow power leveling Skills powerleveling Grade powerleveling Honor the value of wow powerleveling
so nice!
nice bag
nice bag
nice bag
nice bag
nice bag
This is a free wow gold directory,if you have wow gold site, you can submit it, if approve by admin and you will get one way link for your site, and if someone visit cheap wow gold site from here, you will get large Web traffic,so seo friendly!
威而柔,自慰套,自慰套,SM,充氣娃娃,充氣娃娃,潤滑液,飛機杯,按摩棒,跳蛋,性感睡衣,威而柔,自慰套,自慰套,SM,充氣娃娃,充氣娃娃,潤滑液,飛機杯,按摩棒,跳蛋,性感睡衣
情惑用品性易購,情
人享樂挑旦,情人享樂挑旦
免費視訊聊天,辣妹視訊,視訊交友網,美女視訊,視訊交友,視訊交友90739,成人聊天室,視訊聊天室,視訊聊天,視訊聊天室,情色視訊,情人視訊網,視訊美女
一葉情貼圖片區,免費視訊聊天室,免費視訊,ut聊天室,聊天室,豆豆聊天室,尋夢園聊天室,聊天室尋夢園,影音視訊聊天室
辣妹視訊,美女視訊,視訊交友網,視訊聊天室,視訊交友,視訊美女,免費視訊,免費視訊聊天,視訊交友90739,免費視訊聊天室,成人聊天室,視訊聊天,視訊交友aooyy
哈啦聊天室,辣妺視訊,A片,色情A片,視訊,080視訊聊天室,視訊美女34c,視訊情人高雄網,視訊交友高雄網,0204貼圖區,sex520免費影片,情色貼圖,視訊ukiss
色情遊戲,寄情築園小遊戲,情色文學,一葉情貼圖片區,情惑用品性易購,情人視訊網,辣妹視訊,情色交友,成人論壇,情色論壇,愛情公寓,情色,舊情人,情色貼圖,色情聊天室,色情小說,做愛,做愛影片,性愛
免費視訊聊天室,aio交友愛情館,愛情公寓,一葉情貼圖片區,情色貼圖,情色文學,色情聊天室,情色小說,情色電影,情色論壇,成人論壇,辣妹視訊,視訊聊天室,情色視訊,免費視訊,免費視訊聊天,視訊交友網,視訊聊天室,視訊美女,視訊交友,視訊交友90739,AV,AV女優
情惑用品性易購,aio交友愛情館,一葉情貼圖片區,情趣用品,情人享樂挑旦
情趣用品,情趣用品,情趣用品,情趣用品,情趣用品,情趣,情趣
網頁設計,徵信社
A片,色情A片,免費A片,成人影片,色情影片,a片免費看,情色貼圖,情色文學,情色小說,色情小說
Weaknesses of World Of Warcraft Gold the client-server model used by World of Warcraft have been wow power levelingexploited in order to crash the cluster of servers that make up a realm. Exploits also include characters being able to instantly change location or teleport. The situation Cheap Wow Goldbecame worse when trying to coordinate activities across a number of players cheapest wow goldor guilds on the same realm.World of Warcraft Lead Producer, stated that new realms would be introduced to relieve the burden on existing ones. Existing realms would be upgraded.
Although the game wow gold follows a similar model to others in the genreand was noted for having buy cheap wow goldmany familiar concepts from roleplaying games, the new approaches wow gold cheap to reduce pauses between game encounters was gameusd well liked. At various times, World of Warcraft players have experienced problems with connecting to and logging in to wow gold for sale the game. Sudden server crashes that would force realms offline also occurred.
Post a Comment