Browsing the news link feed we have below and to the right, I ran across this article throwing a shout-out to Etsy's own Geekgear, who recycled canning jars into night lights. I was intrigued, however, at Sci-fi's mention of solar powered jar lights. So, I went and dug up this tutorial on not martha and it looks amazing! Who's gonna make one for us to show off? Us? Maybe---we have MAKE magazine's Bre Pettis sharing space with Etsy Labs here on the 6th floor, I'm sure he could help me out with this one.
Hate electrical stuff? (You should get over that.) Buy a sun+moon jar from Geekgear or grab a solar-powered number at here
Showing posts with label Ideas. Show all posts
Showing posts with label Ideas. Show all posts
17 April 2007
Sun Jars!
06 April 2007
Zipper cheat.
 Stop by today at 3pm and I'll show you a stupid easy way to make your zippers in a clutch look finished. Everyone else, I'll post a tutorial tomorrow. Love!
Make Envelopes.
 I made an envelope template for you to print out and use. Make your template out of cardboard or stiff paper and use it again and again to trace and cut envelopes from your interesting ephemera. Download the PDF.
04 April 2007
Almost entirely wasteless pillow.
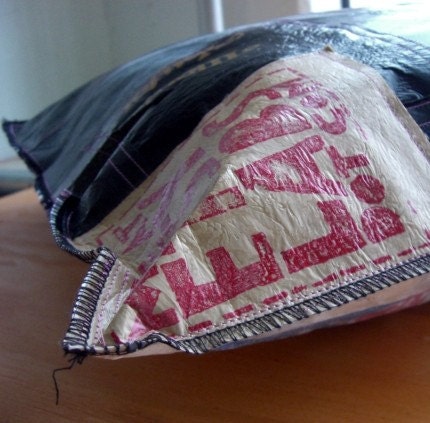
I made this today. Its a floor cushion made of fused plastic bags and stuffed with paper from our shredder--as well as all the "excess" from the sewing, serging and trimming. The only trash this item created was the little strip of plastic visible in the listing photos (click it to see more).
BANGIN PLASTIC BAG TOTES

Pendant tutorial: Personalize your tags!!
Ever wanted to write something special, custom, or downright ridiculous on metal tags?? Well this is how you do it: Materials…here’s what you’ll need:
 Aluminum (or any thin metal) tags…any shape will do
A small steel block (or other hard surface you can hammer on)
A Plastic, wooden, or rawhide malletLetter stamps
( you can find all of these tools at any metal supply store or super cheap online)
Step 1: Place aluminum tag on steel block and place first letter stamp face down but straight onto tag.  Step 2: Take out letter stamps that have the corresponding letters to what you want to write and line them up in the order in which your word is spelled. We chose to stamp “Etsy” and “Etsy Labs” on our tags so we took out E, T, S, and Y letters. This step makes it easier when stamping to find what you are looking for and therefore you can get more done in less time.
 Make sure the letter is in the right position and you don’t goof up by placing the letter backwards (like I have done several times in the past)!
 Step 3: Holding the stamp on the tag with one hand, give the top of the stamp a couple firm straight blows with your hammer or mallet.
 Then repeat this step by positioning the following letters where you would like them to fit on your tag and hammering them in place.
 Step 4: Admire your new customized tag! If you would like, you could add a patina to the letters to make them stand out a bit more, but we chose the “just stamped” look for ours!
Happy Stamping, and keep in mind we have all the tools here if you’d like to drop by and customize a piece of your own!
03 April 2007
T-Shirt Party!

We'll have a stack of books on easy DIY t-shirt modifications, all the sewing machines and sergers in the Etsy Labs arsenal, a large and strange array of notions, appliquemaking bar, and pitchers of grapefruit mimosas. Yeah, yes, come to it.
02 April 2007
Introducing: Skill Sharing!
Hey Everyone! As part of membership to the labs, we have decided to start a program called "skill sharing." This program will include brief tutorials on basic crafting skills that will go on each week in a casual setting. At the beginning of each week, we will announce each skill that will be shared during the week, who will be leading it, the date and time. All members are welcome to stop by and learn the skill for free while it's going on!
We will hopefully be posting brief picture and video tutorials concerning the skill share later in the week after we have completed the mini workshops!
Soooooo come learn with us!
Starting this week, skill shares will involve:
1. Make a customized word metal tag with Mary this Tuesday (tomorrow) at 4pm!! You will learn how to use the letter punches to write anything you want on metal!
2. Learn new techniques in packaging and shipping using recycled materials with Anda during Wednesday's Tea Party at 5pm!!
3. Learn how to make a regular old t-shirt into a fab new halter top with Anna on Thursday at 3pm! Be sure to bring a T-shirt!
4. Learn a quick and easy cheat on how to finish a zipper in a clutch with Anda on Friday at 3pm!
Hope to see you there and hope you will check with us each week for tutorials following the skill share sessions!
Any Project Runway fans out there?
 If you missed the Rosette Workshop taught here at the Labs by Project Runway's own Angela Keslar, we put together some pics to show you from the class:
 The class not only learned all about making rosettes, but grilled Angela all about her experiences on the show and heard all of her inside stories!


28 March 2007

Tu-Tu-Tutorial

To celebrate our upcoming Etsy Labs PSA's, I'd like to share a fun way to make yourself a fabulous tu-tu. Everyone should have one of these in their house - they're very handy for playing dress up if kids are around or if you just need a quick costume for a party. Ok, let's go!
Start with a pile of fabric scraps:
You can make this out of any fabric really, but I chose some pinkish and purplish hued taffetta-like rags to get a traditional girly look.
Cut the scraps so they are a reasonable height (about twelve inches). They can be any length, you can have one continuous fabric layer all around or mix and match a bit. Set your sewing machine to a long stitch length and make basting stitches all around the top edge of all of your fabric pieces.

Once you have the basting stitches in place, gather the fabric by pulling one piece of thread (not both) at the end of the fabric. The fabric should bunch up and you can then spread out the folds evenly by hand.
When you have all of your pieces gathered, lay them out the way you want them to be on the tu-tu. Then, cut the bottom two inches off a t-shirt and cut in half so you have one long strip of fabric. Any long strip of fabric will do, but I like t-shirt material because it has a slight stretch and feels soft against the skin. Measure around your body where you want the tu-tu to sit (waist or hips depending on your preference) and make sure your fabric strip is long enough to fit you with a couple extra inches of ease for the fastener. Pin your fabric onto this strip.

Set your sewing machine to a smaller stitch and sew a straight line over the pins (you should take them out as you go along to prevent jamming your machine.)


Make sure to backstitch at the ends so your stitching is secure. Once you have all of your pieces sewn on (you can add many layers for different effects) sew on some kind of fastener. I chose velcro because it's durable, but you can also use a hook and eye or a button closure if you're feeling saucy. It's a good idea to close up the ends of your fabric strip by folding them and sewing them up with a vertical line of stitching. When sewing on your fastener, make sure it is placed where you want your tu-tu to fit. If you want to wear it around your waist you will have to make it fit smaller than if you want to wear it at your hips. 

Once you have your basic tu-tu made, you can add little embellishments. I added a little rosette using leftover fabric and trimmed it with a button. To do this I gathered the rosette material using the same method and then sewed it on with the button by hand.

The finished product! (See how happy I am?) Accessorize with magic wand, etc.
27 March 2007
Dress Form Tutorial: Want to make an exact replica of your body for custom work?
Yesterday we set out determined to make our own dress forms for the Etsy Labs and thought we'd share the love with you guys if you want to make one of your own or just laugh at our own trails with the duct tape!
Materials:
- A large T-shirt that fits below the bum that will be cut up and destroyed in the process
- Another small piece of discard able cloth (a paper towel will do)
- At least two 45 gram rolls of duct tape
- A pair of sharp scissors
- Cardboard, and cardboard tubing
- Something to stuff the form with (peanuts, foam, polyfil, old clothes, be creative)
- A helper
Here's what ya gotta do:
Step 1
Put on large T-shirt and have your helper begin to wrap the roll of duct tape around your body. Make sure the tape is somewhat smooth and that there are no gaps in between wraps. Stop wrapping once the bust is reached.

 Step 2
Cut several strips of tape from the roll and apply them it a vertical pattern along the curves of the bust for most natural looking shape fit. Be sure to pat the tape down after the helper applies it to ensure shape.

 Step 3
Once taping of bust is complete, begin to extend tape from front to back (making sure model’s hair is clipped up as not to tape hair...eek). Apply the second piece of fabric around the neck and back (sort of looks like a scarf or ascot) and begin wrapping tape around shoulders and bottom of arms until you have completed the basic shape of the dress form you are looking for.

 Step 4
Repeat by continuing to add two more layers of duct tape over original layer to complete a total of three layers. Fee free to either follow same wrapping method or try a vertical layering method, whichever you prefer.
Step 5
With a sharpie, draw a vertical and horizontal line to mark the center of the dress form.
 Step 6
With the scissors, begin to cut tape and T-shirt at the base of the form where your line was drawn. Make sure you have your hand in place between the T-shirt and the regular shirt you are wearing as not to cut your own shirt in the process. If you are having a hard time cutting all the way up the form from the bottom, you can cut from the top as well.
 Step 7
Remove form from body and have your helper hold the form while you add a layer of tape to the cut line. Now you have the desired shape!

 Step 8
Cut a piece of cardboard that fits the bottom of your form and the sleeve holes, tape them in place and stuff the form until you have your desired shape and mass. Close off the top with tape. Either affix finished form to pole made from cardboard tubing or hang from hanger.
Subscribe to:
Comments (Atom)