Showing posts with label skillshares. Show all posts

30 August 2007

9/2 Skill Share: the Coptic stitch


On Sunday, September 2 from 3-5:30 pm , we will be hosting an informal skill share on how to bind books using the Coptic stitch (the exposed spine method that results in the type of book pictured above). Please bring paper to fill your book and covers (such as covers from old books, boards from board games, bookboard, etc.). We will supply the rest.


To RSVP or if you have any questions, please contact julie@etsy.com.

04 August 2007

Skill Sharing!

This Week's Skill Share!
Tuesday, August 7th at 3pm:
Learn to make a wallet out of recycled paper and tape with Mary. You won't believe how ridiculously awesome and simple this is and kick yourself for not thinking of it first!!

Hope we'll see you here and watch out for tutorials coming here soon!

30 July 2007

This Week's skill sharing!


Wednesday, August 8th at 2:30pm:
Learn how to bind books using the Japanese stab binding technique with Julie

Thursday, August 9th at 3pm:
Making the perfect balled ear hook with Danielle. I will show you how to ball up wire, and how to form the perfect shape for some fabulous sterling silver ear hooks.


Hope we'll see you here and watch out for tutorials coming here soon!

26 July 2007

Skill Share: Making A Banner

Hi all! I thought I'd show you how I made the new EtsyLabs banner. I'm not a trained graphic artist by any means but I love making banners, avatars, and general photoshopping! So here's the banner and the tips:


Here's the final product. ps click on any of these images to get some more detail!

Tip Alert! Download a fancy font! My favorite place to download free fonts is http://www.dafont.com/. Once you find something you like download it to your desktop and unzip it. Then go to the start menu -> Control Panel -> Fonts and then click "install font" and find that on your desktop. Do this before opening Photoshop.


Step One - Find some sort of background. I suggest a pic that may be floating around your flickr account, scan some fabric or ribbons, or fine something cool and free on the internet (but don't steal! Make sure its for general use.)

Step 2 - Crop this baby. Don't worry about the size yet. Just crop it so you get a good image (as wide as possible). Crop is a tool found on the left vertical toolbar - it looks like a box.

Step 3 - Now lets set the correct width. It should be 760 pixels. On the top horizontal toolbar click Image->Image Size and set the width to 760 pixels and select "OK".
Step 4 - Now lets work on the height. Do this by adjusting the canvas size (Image -> Canvas Size ). The height should be 100 pixels. In the canvas size window you can adjust the anchor if you want the pic to be cropped from the top, bottom, center etc.

Here's what we come up with so far:


Step 5 - Adding text. On the left toolbar you'll see the letter T. Click it! Now click on a space in the pic where you want to add your shop name. Now type in your shop name. Highlight what you just typed. Now you can change the font, color and size (see those options at the top of the horizontal toolbar in photoshop). Play around until you get a good result.


Step 6 - Rasterize text. At the top click Layer -> Rasterize. You've rasterized!

Step 7 - Add some dimension to your text. At the top again click Layer -> Layer style. Play around! For this banner I chose to use a suble "inner glow". Spooky!!


Step 8 - Glowing airplanes! I wanted those paper airplanes to stick out more. So I used the magic wand first. You can find the magic wand on the left hand toolbar. Once you have selected it just click on the items in the picture you want to "glow" (you can adjust the tolerance at the top if when you click on the items they aren't being selected properly). Hold the shift key while clicking away to select multiple items. Once you've selected all the items you want to pop, hover the mouse over any section of the picture and right click on the mouse. Now "Select Inverse". This should select everything EXCEPT the items you want to glow. Therefore any effect you now use will only change the background and not these items.


So now since I want everything BUT the airplanes to look a little less bright I go to Image->Adjustments->Hue/Saturation. I decrease the saturation to make it a little duller. Feel free to play around in this section though! See what other effects you can create.
Step 9 - Save! Select File -> Save As. Save it as a JPG file. Save it somewhere you can find it in a minute.

Step 10 - Upload! Log into your etsy account. On the left side under Shop Setup you'll see "Appearance". Click it! Now in the banner upload box find your new banner! Once you have all you have to do is click "save changes" at the bottom and you are golden!

Tomorrow I'll be following up with a few more photoshop banner tips using actual Etsy members who have requested new banners. So stay tuned!

xo

Danielle


25 July 2007

Skill Sharing!

Need to learn how to make a banner for your Etsy shop??
Check out this week's skill share with Danielle!


Thursday at 3pm: How to make an Etsy banner in Photoshop with Danielle! If your shop needs a banner, go ahead and post here and she can use your shop as an example for the skill share!

24 July 2007

TRASHION: How to make a long halter tunic from a t-shirt

So, I made one of these a bit ago, and EVERYONE wanted to know how to make their own. So, in honor of the Trashion trunk show/art party (happening here on Friday, July 27 from 6-8PM), here it is, guys. All you need is a t-shirt, scissors, thread, and a sewing machine (and you could prolly do it by hand if you want). Arright, let's begin!


Here's the "before"


1. With the tee inside out, stitch the sleeves closed.


2. Cut off the top in a straight line, just below the neck band. Cut off the sleeves, leaving about 3/8" seam allowance.
3. Try the shirt on inside out. Pin the sides to fit.


4. Sew along where you've fitted, all the way to the top edge, and backstitch.


5. Trim the seam allowance to 3/8". Press the seams open.


6. Turn the shirt to the correct side. Make two tiny holes (it will stretch) near the top of the shirt for the straps.


7. Cut off the hem and string through the holes. Tie several knots on each side to hold.


AND DONE!

to get to the Etsy Labs for the Trashion show!
325 Gold St. 6th Floor
Brooklyn, NY 11201

16 July 2007

HOW TO MAKE A TRAPEZE DRESS FROM A MUUMUU

Hi guys! Do you need a cute and swingy dress or top to get you through the summer? Well, grab a muumuu from the thrift store and chop it down to fit. Mary and I had a great time making our dresses, and it only took about 30 minutes. Here's how to do it:

SKILL LEVEL: Intermediate (you've made, oh, at least 3 projects)
MATERIALS:
* muumuu, dress, or nightgown that is too big for you
* sewing machine
* matching thread
* clear plastic ruler (or piece of cardboard or printer paper if you don’t have it)
* tailor’s chalk or pencil (or regular pencil if you don’t have it)


BEFORE PICS (sad faces!)


1. Try the dress on inside out.
2. Fit under the arms on both sides: Place a pin vertically through both side seam layers to mark. Fit test: you should be able to move your arms comfortably.
3. Decide the length (optional): Fold the hem up until you find a length that you like. Pin in the front in a few spots to hold it in place. Fit test: stand up straight, and look in a full length mirror. Hint: get it to hit the slimmest part of your thigh for the most flattering look, or just wherever you want you don’t care about such things.
4. Marking and cutting the hem (optional):
a. Put a pin in the crease that marks the final length. Measure ¾” (for the double hem fold back) below this point and mark this spot with your tailor’s chalk.
b. Take the pins out of the hem area, and lay the muumuu flat, still inside out. Measure the distance from the mark to the existing hem (or cut a piece of cardboard or paper to size- you might have to tape several together). This distance is the hem length
c. Moving around the hem, mark hem length.
d. Cut along the marks.
5. Sewing the side seam:
a. On the bottom of both side seams, measure ¾” up from the hem. Mark with tailor’s chalk.
b. Using your ruler (or straight edge of cardboard), draw a straight line from the point where you pinned under the armpit to the mark ¾” from the hem.
c. Sew along this line. Cut off excess fabric on the side seam, leaving 3/8”. d. If you like, clean-finish the seam by pressing the seam allowance towards the back, and zigzag stitch over the seam allowance on the front side.
6. Sewing the hem:
a. Fold the hem up 3/8” towards the backside. Sew ¼” from the edge (you can use the foot as your guide).
b. Fold the hem again 3/8”. Stitch on the correct side with a zigzag stitch.
7. Making the cap sleeve (optional):
a. Turn the muumuu inside out.
b. Measure 3” (approximate guideline- see what will look best on your dress-this is where the bottom of the sleeve begins) up from the armpit/side seam on front. Mark with a pin.
c. Measure 2.5" (approximate guideline- this is the length of your sleeve- look at this with the muumuu on and see where you'd like it to hit) from shoulder seam down outside edge of sleeve. Mark with a pin.
d. Draw a gently curved line between these points.
e. Cut around line. At bottom of sleeve, cut ¼” from sleeve seam.
f. Fold back ¼” all around, and sew with narrow zigzag stitch.
8. Finishing touch: If you want, you can make a belt out of the excess fabric you cut from the hem. I just folded it back 1/4" on all sides and zigzagged around. Mary appliqued on top of hers and added a fat belt for extra style.


ALL DONE!


questions, grasshopper? Send an etsy conversation to HeyMichelle and I'll help you get on the path to muumuu-dom.

Tutorial: Making and Applying Appliques

How to make and apply an appliqué to fabric:

Here's what you'll need:
  • iron
  • ironing board
  • assorted fabrics
  • thread
  • embroidery floss (optional)
  • sewing machine (optional)
  • scissors
  • fusible interfacing (look here)
  • buttons (optional)
Here's what you do:

step 1: First you will need to have an idea of what you want your appliqués to be shaped like, how many pieces you want, and it is a good idea to make a sketch or sketches of each piece.
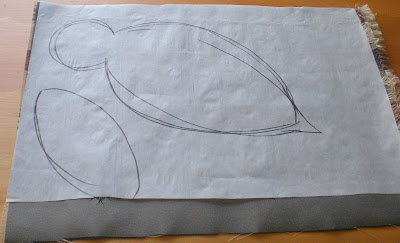
step 2: Cut out squares of the fusible interfacing big enough to hold the area of your sketches. To save interfacing, try sketching your applique idea onto the back (smooth side) of the sheet and cutting out the square around it.

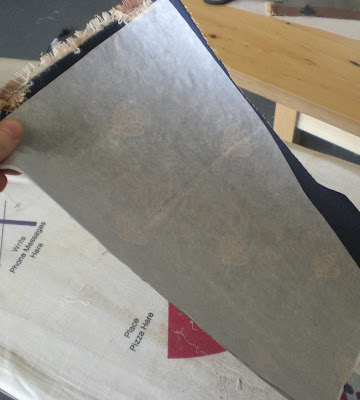
step 3: After you have your squares of interfacing cut, place them rough side down on top of the designated color fabric that is on your ironing board. The fabric should be "right side" (the side you want to show) facing down towards the ironing board. Make sure your fabric is a little bit wider than the squares of interfacing so the ironing board doesn't get sticky!
step 4: Now make sure your iron is heated up and set on a silk setting. Start gently gliding the iron over the fabric with the smooth sided interfacing on top. As the paper becomes flatter you can apply more pressure with constant iron movement. This should only take a 2-5 seconds and you will notice the paper adhering to the fabric and becoming one stiffly bonded piece.
step 5: Set down the iron (but keep it on) and start cutting out the desired appliqué shape from the fabric/paper sandwich (I chose a bird on bee printed fabric). Once you have your shapes cut you are ready to adhere them onto anything now!! A bag, shirt, tote, more fabric, pants, skirt, cardboard, and some pieces of wood!
hint: If you don't want to attach them to anything, you can give just the appliqués as presents or sell them alone for other people to use them for their own crafty projects. Just leave the paper on the back of the patch and viola!
step 6: So you're ready to attach your appliqué? We'll use a tunic in this example (the tunic is actually one I reconstructed from another skillshare showing up later this week). Place your tunic flat on the ironing board positioned where you want your appliqué to sit. Run the iron over it a couple times to make sure it is smooth and warms up the surface a bit. Peel off the paper backing from your appliqué and you will notice a clear sheen adhesive bonded to the fabric. Place the bonded side down onto the shirt flat.
step 7: Iron on top of "appliqué/tunic sandwich" keeping movement. As the fabric heats up apply more pressure. Check to see if fabric and appliqué are bonded well; you might have to check a couple times before getting it just right. Once fabric is bonded set down iron and turn off.
hint: You have now successfully bonded your appliqué to your shirt! You can leave it like this if you want, but for a more secure, structured, and detailed appliqué...keep reading.
Step 8: It is now time to reinforce your bonded appliqué with sewing. You can hand sew the edges of the appliqué with either thread or embroidery floss, or you can run it through the sewing machine like we have pictured below. Get creative with your sewing using different threads, colors, and stitches. You can also use buttons to add details like eyes, bubbles, and other round imagery!
You now have a new perfectly appliquéd item! This technique is so great for dressing up old clothes, totes, curtains, etc....get creative!
*Note: Once you have appliquéd clothing, the washing instructions may change due to the material you have chosen to adhere. For best results, hand wash appliquéd clothing!

09 July 2007

Skill Sharing!

Re-introducing SKILL SHARES:
As part of membership to the labs, we have been conducting a program called "skill sharing." This program includs brief tutorials on basic crafting skills that will go on each week in a casual setting. At the beginning of each week, we will announce each skill that will be shared during the week, who will be leading it, the date and time. All members are welcome to stop by and learn the skill for free while it's going on!

We will also be posting brief picture and video tutorials concerning the skill share later in the week after we have completed the mini workshops...Soooooo come learn with us!

Starting this Monday, skill shares will involve:
Monday 7/9, 3pm: Learn to make a drawstring pouch with Anda! Make a simple small drawstring pouch from your leftover scrap fabric. Awesome for promos or to hold the lipbalms you'll make later this week with Julie!
Tuesday 7/10, 6pm: Learn how to make the perfect appliqué patch you've been just dying to make to dress up your shirt, bag, pants, skirt...the possibilities are endless! Then we'll learn how to apply it!
Wednesday 7/11, 2pm: Learn the ins and outs of making your own lip balm with Julie!! Learn how to make your very own lip balm using a vegan base, flavor oils, and recycled containers. Feel free to bring your own lids or used lip balm containers to pour your concoction into.
Friday 7/13, 3pm: Reconstruct a Mu Mu dress with Michelle! Transform a thrift store muumuu into a swingy trapeze dress.

Hope to see you there and hope you will check with us each week for tutorials following the skill share sessions!

14 May 2007

This Week's Skill Share!


Hey everyone! This week we will be sharing the following skill, so members come on out and join in....you might learn a new skill or two:

  • Wednesday at 6pm, Mary will be leading a skill share on creative ways to use shredded paper, so if you're coming for tea, hang out after and join in!

Hope to see you at the Labs this week and stay tuned for pictures from this past weekend's workshops!

11 May 2007

Plushie Tutorial!

Who wants to learn how to make adorable plushies like these? They are super simple and once you learn the basic skill of the plushie, you can apply the skill to any shape or design you desire!

Here's what you'll need: colored felt and fabric, needle, thread (matching body design), scissors, buttons, stuffing, and a sewing machine (optional if you are an efficient hand-sewer):


Step 1: Cut out desired shapes of both leaves and body of carrot while leaving a little room (making it fatter) on the edges to allow for sewing. You can either draw your desired shape on the fabric and cut it out or cut it free form:
Step 2: Run leaves through sewing machine to add desired embellishment detailing with stitching:


Step 3: Make sure the "wrong sides" (the side you don't want showing) of the carrot are facing outwards on both sides and sandwich the leaves between them. You will want to invert the leaves on the inside of the carrot facing down with the base of them sticking out a little past the edges of the carrot fabric sides:
Step 4: Pin your fabric in place securely and begin to slowly run it through the machine on the edges of the carrot fabric. (I prefer to start on the side of the carrot and work my way around the top where the leaves are):


Step 5: Stop sewing when you reach around the side of the carrot that you began with leaving an opening in the same side: Step 6: Turn carrot completely inside out and begin to slowly stuff it with your polyfil or desired stuffing material:
Step 7: After stuffing the carrot to your desired fill, sew up the opening in the carrot by hand with needle and a thread matching the body of the carrot. You will want to sew the sides as close to the seam as possible, trying to conceal the stitching:
Step 8: Tie a knot in the thread when you have finished stitching the opening tight and trim all loose threads, and any stuffing that may be on the seam:
Step 9: Applique/sew on two of your desired buttons for eyes:
And now you have a new friend:
Maybe now you can make new friends for your little carrot like these: