Lip balm is surprisingly easy to make. We made lip balm using the easiest/quickest/laziest way possible that involves all common household tools. We'll also be covering the proper, slightly more involved method of lip balm making (noted in italics).
What you'll need:
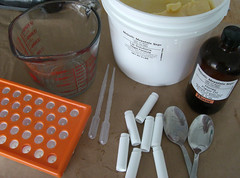
-lip balm base or waxes+oils+extras (see The Slower Way, below)
-essential or flavor oil(s)
-pipettes (one for each flavor )
-microwave or double-boiler (see The Slower Way, below)
-glass measuring cup with pouring spout
-spoons or spatulas
-lip balm tube holder (optional, but I'd highly recommend it, if you're filling a great quantity of tubes)
-lip balm tubes, jars, pots, lids, bottle caps, etc.---any container that you would like to use for your lip balm
-shrink bands for sealing containers (optional--but recommended, if you're going to be selling your lip balm)
-newspaper or craft paper to cover your counters
-towels for cleaning up
The Fastest Way
Step 1: Preparation

(a) Buy your supplies. Listed below are the sources that we used and can recommend from personal experience.
(b) Set up all the supplies you'll need on a countertop covered in newsprint or craft paper. You'll be glad you did this because lip balm can be hard to clean up if you make a mess. I would recommend working in the kitchen as close to the microwave as possible, since you'll be using it a lot, if you're following this method. Be sure you have all your supplies ready, including the containers you'll be pouring into. Once the mixture is melted, you'll need to work quickly, but steadily, so the mixture doesn't harden before it has been poured.
(c) Put on your favorite apron/lab coat, if you feel so inclined.
Step 2: Scooping
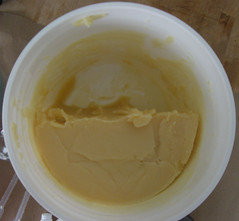
Scoop out your base into a glass measuring cup that has a spout.

Step 3: Melting 
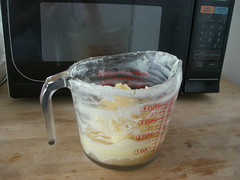
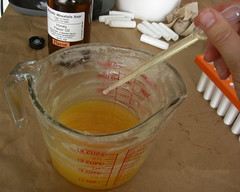
Melt the base in the microwave. Take out every 30-45 seconds and stir, so that the base is heated evenly.
Step 4: Flavoring 
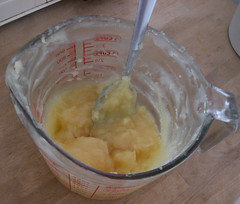
After the base has melted completely and has cooled very slightly, use a pipette to drop in the appropriate amount of flavor or essential oils. Use a different pipette for each flavor/scent that you use, so as not to cross-contaminate. The honey flavor oil we used called for 2-4% of flavor oil to base. 2-4% is a good rule-of-thumb for flavor. Essential oils need less, about 0.3-1.5%. The oils you choose may recommend different proportions, so check before you get started. Stir just until mixed.
It is important that you add your flavor/essential oil after you melt the base. If you add the flavor before you melt the base, it will lose its potentcy in the heating process.
Step 5: Pouring 
Using the very same measuring cup that you melted the base in, pour your mixed and melted concoction into your tubes or jars or what have you. That's why the spout is so handy. If you're using tubes, fill only to the top of the inside screw. Once the mixture has cooled, finish filling the tube. Pour almost all the way to the top, for that professional and rounded look. This process avoids the risk of cracking that can occur when filling the tube in one go. If you're using jars or lids, just pour all the way to the top in one pour.
Don't be discouraged if you make a mess when you first start pouring. After a few tries, you'll be a pro. It's all in the wrist.
I've read that you can transfer the melted lip balm mixture to the containers using plastic pipettes (but not glass), but I had no luck with that method. I found that the lip balm hardened inside the pipette before it could be dispensed.
Step 6: Labeling
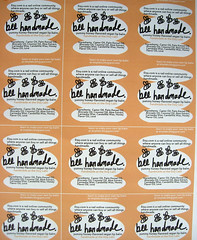
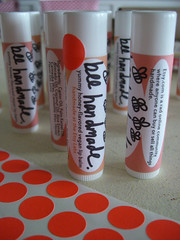
Make some sweet labels. Anda made these on Photoshop. Aren't they
beeautiful?
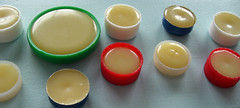
Below are some examples of recycled containers for lip balm. We're currently trying to rack our brains for a good way to make the lid-container lip balm more transportable. Any ideas? Send them our way!


Step 7: Sell your lovely lip balm on Etsy or give it to all your friends!
If you're planning on selling your lip balm, there are some FDA guidelines that you need to keep in mind when creating the labeling and packaging. You can find the FDA's Cosmetics Labeling Guide here:
http://www.cfsan.fda.gov/~dms/cos-lab3.html#clgk. We're not sure of the legalities of selling lip balm in recycled containers, so that is something to also consider.
The Slower Way & Other Tips
Don't be frightened, The Slower Way really isn't scary. Unfortunately we don't have pictures because we were too impatient to get crackin' on the lip balm production and we have a microwave, but not any sort of double-boiler.
1. Instead of buying a pre-made base, you can buy wax (beeswax, candelilla, carnauba) oil (safflower, sweet almond, coconut, castor) and other additives (such as vitamin E, shea butter, cocoa butter, colorant) from any of the suppliers below. You can either play around to try to find a consistency and combination that you find most pleasing or follow a recipe, which can also be found on those sites. A mixture containing more oils makes a glossier lip balm, while a mixture containing more wax and butters creates a more matte lip balm.
2. If you would like to add a hint of color to your lip balm, simply add some pieces of old lipstick during the melting step of the process.
3. If you would prefer not to use a microwave for melting, improvising a double-boiler is easy. You can either use (a) a saucepan or (b) an electric frying pan. Be sure to use potholders and be aware that boiling water is indeed HOT.
(a) Fill the saucepan partially, about a 1/3 of the way, with water. Place the glass measuring cup that contains the base (either the one you bought pre-made or concocted yourself from wax+oil+extras) in the water. Heat till simmering. Once the mixture has melted, pour into the containers, as detailed in The Fast Method (see above).
(b) Using a saucepan is essentially the same thing, except that you'll need need to fit the pan with a wire rack for the measuring cup to rest upon. Proceed as described above.
4. When using with the Fast Method, particularly, working in small batches is a good idea because (a) a small batch is lighter and easier to pour and (b) a small batch doesn't start to cool before you're done pouring.
5. Remember, although the process of making lip balm uses many household tools, be sure to keep these tools separate from your actual cooking tools. Use measuring cups and spoons that you don't mind sacrificing for using only for lip balm. You don't want to eat that stuff.
Resources
Mabel White Home Living Corp.
This company has an extensive selection of flavor oils. They also have an extensive selection of everything else you'd need, including shrink bands to seal tubes and jars, plus instructional videos.
Majestic Mountain Sage
We bought vegan base and the tube holder from here. They also have a comprehensive stock of lip balm supplies.
http://www.thesage.com/Not MarthaThis blog has good illustrated step-by-step instructions for making lip balm that features the double-boiler method of melting the base.
The Chemistry Store

 So, I made one of these a bit ago, and EVERYONE wanted to know how to make their own. So, in honor of the Trashion trunk show/art party (happening here on Friday, July 27 from 6-8PM), here it is, guys. All you need is a t-shirt, scissors, thread, and a sewing machine (and you could prolly do it by hand if you want). Arright, let's begin!
 1. With the tee inside out, stitch the sleeves closed.
 2. Cut off the top in a straight line, just below the neck band. Cut off the sleeves, leaving about 3/8" seam allowance.
 4. Sew along where you've fitted, all the way to the top edge, and backstitch.
 6. Turn the shirt to the correct side. Make two tiny holes (it will stretch) near the top of the shirt for the straps.
 7. Cut off the hem and string through the holes. Tie several knots on each side to hold.